You just crafted the perfect Google Business post – a lash sale, a seasonal offer, or a new product announcement. But it’s 11 PM, and your customers won’t see it until morning. Would you set an alarm? Leave a sticky note? Or just hope that you remember to post between the meetings?
Instead, why not use Google Business Profile post scheduler to schedule your post in advance.
Scheduling Google Business Profile posts (now called Google Business Profile posts) means that your updates go live exactly when your audience is most active. Also, you don’t need to be glued to the screen every time you want to post.
Whether you manage one storefront or fifty locations, scheduling keeps your local presence consistent, visible, and working for you around the clock.
In this guide, we’ll walk through everything – what Google posts are, why scheduling them matters, the different types of posts you can schedule, and step-by-step methods to do it (both natively and with third-party tools). We will also discuss some best practices to squeeze every bit of local SEO value from each post.
Key Takeaways:
- Google Business Profile posts expire after 7 days, so consistent scheduling is essential to keep your local profile active.
- Google launched a native post scheduler in late 2025, and it takes care of your scheduling needs if you are a single-location business. However, multi-location businesses and agencies might need third-party scheduling tools for bulk scheduling, approvals, and unified reporting.
- A good strategy to stay consistent is to batch-create 8–12 posts per month in one session, then schedule them weekly for the most efficient workflow. Make sure that all GBP posts include a CTA button, a local keyword, and a high-resolution image.
What Are Google Business Profile Posts?
Google Business Profiles help businesses manage their presence on Google Search and Maps. But just having a GBP profile is not enough. Being consistent with your posting schedule is what makes a real difference.
Google Business Profile (GBP) posts (formerly known as Google My Business posts, or GMB posts) are short updates that appear directly on your business listing in Google Search and Google Maps.
Below is a GBP profile post by Block restaurant, which includes an update on their “Weekly Wednesday plans.”

Think of them as mini social media posts – but instead of competing for attention in your social network, they show up right when someone is searching for your business or a service you offer.
Google posts can include text, images, videos, call-to-action buttons, and links. They appear in the “Updates” section of your Business Profile and give potential customers a reason to engage with your business, whether that’s clicking through to your website, calling your store, or redeeming an offer.
Here’s what makes GBP posts unique compared to regular social media:
1. They appear in search results.
When someone searches for your business on Google, your Google posts show up right after your working hours and just before your reviews. This is prime real estate and instantly captures the reader’s attention.

2. They target high-intent users
Google business posts are for people who are already searching for your business on Google Maps. If not your Google business account in particular, they are looking for local businesses offering similar services and are close to making a decision.
3. They signal freshness to Google
Google posts behave like temporary updates and not permanent content. So, they tell Google’s algorithm that your business is active, which can influence your ranking in the local map pack.
4. They’re free
Unlike Google Ads, Google business posts cost nothing to publish, making them one of the most cost-effective local marketing tools available.
But GBP posts expire after 7 days, so regular posting becomes crucial. This is where scheduling becomes important.
Why Schedule Google Business Posts?
If you are a business looking to win in local searches, it is important that you start treating GBP as an ongoing content channel, not an afterthought. Here’s why scheduling Google posts is the smartest way to stay consistent:
- When you publish content regularly, it signals to Google that your business is engaged and up to date. Consistency helps you rank higher in the local map pack and appear above organic listings. In fact, businesses posting twice weekly see ~67% more profile views vs. weekly posters.
- Most of your Google posts disappear after 7 days, and event posts disappear after the expiration of the event date. So, it becomes critical to post regularly, and scheduling helps with that.
- For businesses managing multiple accounts, manual posting can be very time-consuming. Scheduling lets you batch-create multiple posts in one focused session.
- A scheduling tool centralizes content posting across multiple locations. Using just ne centralized dashboard, businesses can customize posts for local relevance and ensure that every profile gets the same attention.
Types of Google Business Posts You Can Schedule
Not all GBP posts are created equal. Each type serves a different purpose and has its own format. Understanding these will help you plan a more strategic social media content calendar and effective posting schedule.
1. Update Posts (What’s New)
These are the most versatile post types. Use them for general announcements, tips, company news, behind-the-scenes content, or anything you want your audience to know.
Start your update post with a beautiful picture, followed by a hook. This is probably the first line of your post. Make it something that instantly grabs attention.
Next, you can explain your update, but keep it short. Talk about the values or the benefits and then end the update with a simple CTA. You can also add your website link, as shown in the image below.

Best for: Sharing blog posts, announcing new services, highlighting team members, posting seasonal tips, or simply keeping your profile active.
2. Event Posts
Event posts are the most underused and the most powerful type of Google post. It acts like an invitation where you add all the event details to tell people about what is happening and invite them to the event.
Event posts are time-bound and include a start date, end date, and event title. These posts stay visible on GBP until the event ends.

Best for: Workshops, webinars, grand openings, seasonal sales, community events, holiday specials, or limited-time promotions with a clear timeframe.
3. Offer Posts
Offer posts are designed for limited-time offers, promotions, and deals. They feature bold visual formatting that stands out on your profile and can include coupon codes, redemption links, and terms and conditions.

Best for: Discount codes, buy-one-get-one deals, flash sales, seasonal promotions, or loyalty rewards.
4. Product Posts
If you’ve set up the Products section on your Google Business Profile, you can showcase individual products with images, descriptions, prices, and purchase links. While not available to all business categories, they’re incredibly valuable for retail, e-commerce, and service-based businesses with defined offerings.

>
Best for: Highlighting bestsellers, new arrivals, seasonal items, or service packages with clear pricing.
Getting the technical details right ensures your posts look professional and display correctly:
| Spec | Details |
| Character limit | 1,500 characters total, but only the first 150–300 characters display before the “Read more” truncation. Lead with your hook. |
| Recommended image resolutions | Minimum 400 X 300 pixels; Maximum 10MB, Recommended 720×540 pixels (4:3 aspect ratio). |
| Image formats | JPG and PNG |
| Images per post | Up to 10 images per post |
| Video resolutions | Supported, short-form videos of up to 30 seconds, 75 MB, with a minimum resolution of 720p |
| CTA buttons | Book, Order Online, Buy, Learn More, Sign Up, Call Now |
| Content guidelines | Avoid sharing sensitive or personal information. Ensure all content aligns with Google’s posting standards. |
| Restricted content practices | Do not include phone numbers or overly sales-heavy language in the main post text, keep it informative and user-focused. |
Tip: Always include an image. Profiles with photos receive significantly higher clicks than those without, and visuals can triple engagement compared to text-only updates.
How to Schedule Google Business Profile Posts (Step-by-Step Methods)
There are two main ways to schedule your GBP posts: using Google Business Profile post scheduler (which is Google’s built-in native scheduler), or using a third-party tool like SocialPilot.
Here’s how you can schedule Google Business Profile posts using the native tool:
Method 1 – Using Google Business Profile’s Native Scheduler (Free)
Google rolled out a native scheduling feature in late 2025, and it’s now available to most business profiles. It’s completely free and doesn’t require any third-party tools.
Step-by-Step Walkthrough
1. Login to Google Business Profile – Open your desktop browser and navigate to business.google.com. Sign in with the Google account linked to your business. If you have not set up your page yet, follow this guide on how to set up a Google Business Page, before you start creating posts.

2. Click on the “Add Update” option – Look for the “Add Update” option and click on it.
3. Select your post type – In the next window, choose from Update, Offer, or Event based on what you want to publish.

4. Add your content – Write your post copy, upload images (up to 10), and add a video if relevant. Remember, keep the most important information in the first 150 characters.
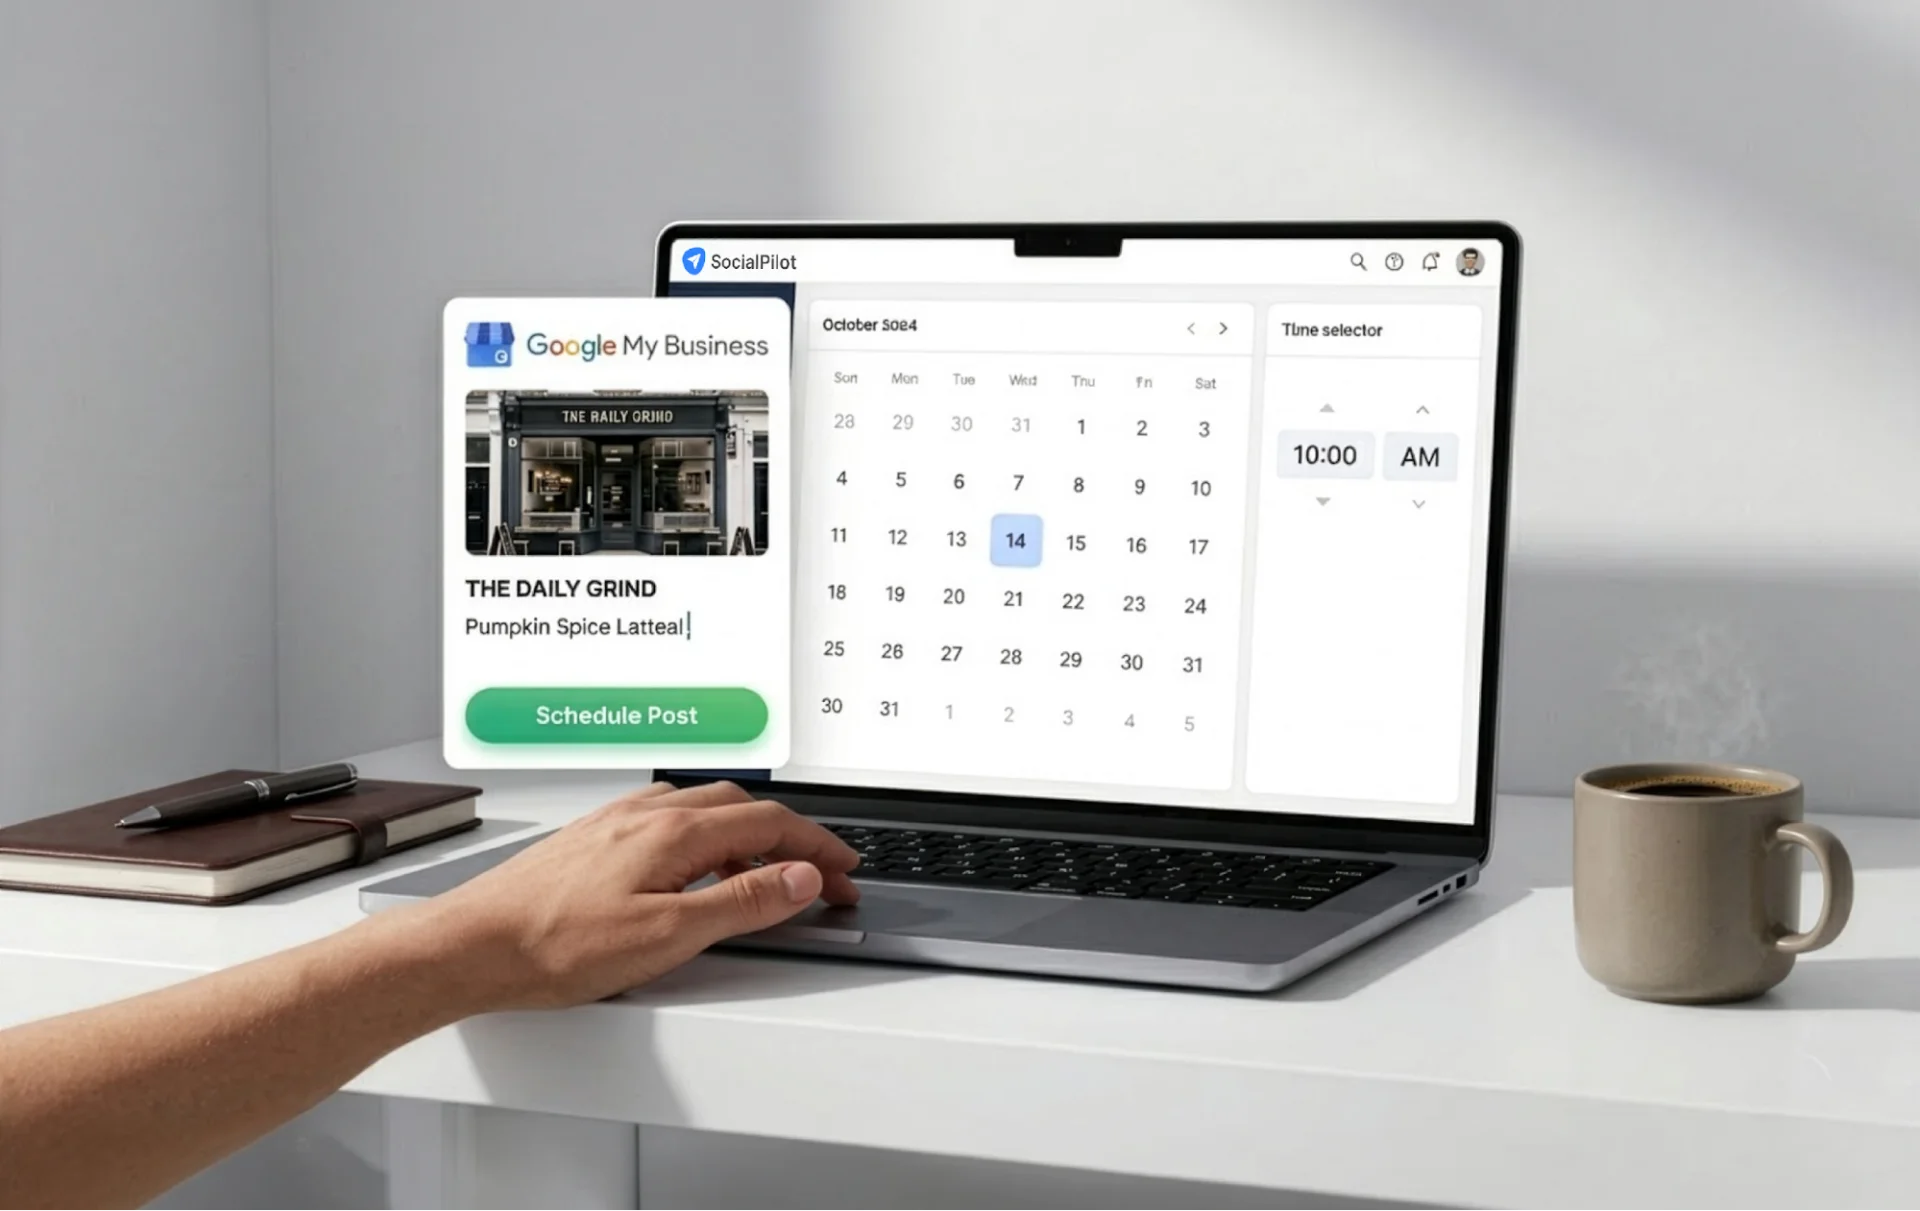
5. Toggle “Schedule this post” – Instead of publishing immediately, flip the scheduling toggle on, as shown in the below image. This reveals date and time selection fields.

6. Set your desired date and time – Choose exactly when you want the post to go live. You can schedule from minutes ahead to well into the future.
7. Add a CTA button and link – Select an appropriate call-to-action (Book, Learn More, Call Now, etc.) and paste the destination URL.
8. Preview and publish – Review how your post will look, then confirm. The post will go live automatically at the scheduled time.
Limitations of Native Scheduling
While the native scheduler is a great free option, it has significant limitations for growing businesses:
- Limited Mobile Experience: While GBP allows basic post creation on mobile devices, native scheduling features are not consistently available across mobile interfaces. For reliable scheduling and planning, businesses must rely on desktop workflows.
- No bulk scheduling: You must create and schedule each post individually. There’s no way to upload a batch for bulk posting.
- No team approval workflows: There’s no built-in way to route posts through a review/approval process before they go live.
- No unified content calendar: You can’t see all your scheduled posts across platforms in a single view on your GMB post scheduler.
- No advanced analytics: While GBP analytics allows you to check the search performance, profile views, and the actions taken on your profile, it does not provide detailed engagement metrics, CTR, conversion tracking, audience insights, and performance comparisons between your posts.
No multi-location management: If you manage multiple locations, you have to log in to each profile separately and schedule posts one by one.
For a single-location business with simple posting needs, the native scheduler works. But the moment you need to scale, collaborate, or manage efficiently, you need something more robust.
SocialPilot is a social media scheduling and management platform that supports Google Business Profile alongside other major platforms. It’s built for teams, agencies, and multi-location businesses that need more than what native tools offer.
Step-by-Step Walkthrough: How to Schedule GBP Posts Through SocialPilot
1. Sign up and connect your Google Business Profile
Create a SocialPilot account (a free trial is available). Navigate to the account connection section and link your Google Business Profile. Then click on the “Connect Account” option, followed by the “Google Business Profile” option, towards the bottom left of the page.
If you manage multiple locations, you can connect all of them in one go.

2. Go to the Create Post Section
From the SocialPilot dashboard, click on “Create Post.” Next, select the GBP icon from the top. You’ll see a clean content editor where you can compose your GBP post.

3. Select your GBP accounts
The next step is to choose which Google Business Profile location(s) you want to publish to. All the connected GBP accounts will be displayed on the right side (as shown in the above image).
You can also select multiple locations simultaneously to share one post across multiple profiles.
4. Choose your post type
SocialPilot allows you to create multiple types of GBP posts, like link posts, image posts, and posts with CTA. To create a link post, simply include the link along with your post content. We will be discussing image and CTA posts in the next point.

5. Compose your Image or CTA Posts
Start by clicking on the “Add Media” button on the left to add media from your local device, Google Drive, Dropbox, or Box.

You can also use stock images. Just click on “Add media from external sources,” and look for an image by typing a relevant keyword. Once you select your image, click on “Add Image”.

Then, you can use SocialPilot’s built-in AI assistant, called AI Pilot, to generate post content, captions, or rephrase your content for better engagement.

Lastly, add a CTA button with a link. Click on the “Call to Action” button, choose the relevant CTA, then paste the link you want to associate with the CTA.

6. Add Custom Fields or UTM Parameters (Optional)
You can also use the custom field option to quickly insert your business information without retyping. Just click on “Custom Fields” and add your:
- Contact details
- Store hours
- Location
- Offer codes

For UTM parameters, click on the UTM selector that appears directly below the caption field once you insert a URL into your post. Then click on the UTM tag dropdown to select from your saved UTM presets, as shown in the above picture.
By adding custom UTMs, you can track the effectiveness of your GBP posts by adding pre-determined tracking links to all the URLs that you add in your post.
7. Schedule the post
Finally, click the “Schedule Post” option, select your desired date and time, then click “Schedule.”
Alternatively, you can automate Google Business Profile post scheduling by adding GBP posts to a queue that auto-publishes based on your pre-set best-time slots.

If you are an agency working with multiple clients, or a business operating as a team, you can also set up approval workflows before your GBP post goes live. By fixing the social media approval bottlenecks, you allow approvers to easily review, comment, and request changes.
Once you have scheduled your posts, you can see them in SocialPilot’s visual content calendar along with the other posts that you have scheduled for different social platforms. You can also drag and drop to schedule your post directly in the content calendar.
Why Some Third-Party Tools Works Better Than Native Scheduling
To understand this, let us do a quick side-by-side comparison of SocialPilot and the native GBP/GMB scheduler.
| Feature | Native GBP Scheduler | Third-party tool (SocialPilot) |
| Bulk scheduling | Limited to scheduling one post at a time | Schedule multiple posts at once using bulk upload or CSV |
| Multi-location support | Manage one location per post | Publish to multiple locations simultaneously from a single dashboard |
| Content calendar | No centralized calendar view | Visual drag-and-drop calendar for easy planning across platforms |
| AI content creation | Not available | AI Pilot helps generate post ideas, captions, and refine content |
| Approval workflows | No approval or review system | Multi-level approvals with comments and feedback |
| Analytics | Basic performance insights only | In-depth analytics with post-level performance and exportable reports |
| Team collaboration | No collaboration features | Role-based access, team collaboration, and client management tools |
| Platform support | Limited to Google Business Profile | Supports GBP + Facebook, Instagram, X, LinkedIn, Pinterest, TikTok, and more |
| Mobile access | Limited mobile functionality | Fully functional mobile app for scheduling and management |
| Pricing | Free to use | Flexible pricing plans suitable for small teams to large agencies |
For agencies managing client profiles, and social media for multi-location brands, or marketing teams that need collaboration and efficiency, SocialPilot turns GBP posting from a manual chore into a streamlined, scalable workflow.
Best Practices for Scheduling Google Business Profile Posts
Scheduling is just the mechanism – what you schedule and when you schedule it determines results. Here’s how to make every post count.
1. Post Frequency – How Often Should You Post?
Since most GBP posts expire after 7 days, posting at least once per week is the bare minimum to keep your profile fresh. But for maximum impact:
- 1–2 posts per week is the sweet spot for most local businesses.
- 3–4 posts per week if you’re in a competitive local market (restaurants, real estate, legal services).
- Daily posting is overkill for most – but if you have the content, it won’t hurt.
A practical approach is to batch-create 8–12 posts per month in a single session, then schedule them out weekly.
Read this guide for more insights on how often to post on social media, learn about ideal posting frequencies and make the most of your social media presence.
2. Writing Posts That Drive Action
Every GBP post should have a purpose and push the reader toward an action. When creating a post, follow social media best practices to make sure your posts are effective and add value. What does the reader gain? A discount? Useful information? A solution to their problem?
Put that in the first sentence – before the “Read more” truncation.
Also, add relevant local keywords to the text, and an appropriate CTA button towards the end.
3. Image and Visual Best Practices
Visuals are non-negotiable. Posts with images get significantly more engagement than text-only updates. Make sure to follow the recommended social media image sizes. For GBP posts, stick to the recommended size of 1200 × 900 pixels (4:3 ratio).
Avoid text-heavy images, because Google can be finicky about images with too much overlaid text.
Scheduling Around Local Events, Holidays, and Seasons
The most effective GBP posts feel timely and relevant to what’s happening in your community:
- Plan around local events like farmers’ markets, festivals, school events, and sports seasons.
- Schedule holiday content early, have it scheduled weeks in advance to prevent last-minute hassle.
- Adjust for seasonal demand and align your content with when customers actually need your services.
- Schedule and publish regularly around the times when your audience is most active.
4. Monitoring Performance and Iterating
Scheduling isn’t “set it and forget it.” Review your post-performance regularly. Look at views, clicks, and engagement on your posts. Which post types get the most interaction? Which CTAs drive the most clicks?
GBP Analytics shows how people interact with your profile. Focus on these key metrics:
- Search impressions — how often your business appears in search
- Website clicks — visits driven by your posts
- Call clicks — users tapping to call directly
- Direction requests — intent to visit your location
A healthy trend looks like rising search impressions paired with steady or increasing clicks and calls – this indicates better visibility and strong user intent.
If you’re using SocialPilot, you can consolidate these insights into unified reports across locations and platforms, making it easier to spot trends and optimize faster.
Common Mistakes to Avoid When Scheduling GBP Posts
Even with a scheduling system in place, these missteps can undermine your efforts:

1. Letting Posts Expire Without Replacing Them
This is the number one mistake. You schedule a few posts, feel good about it, then forget to queue up the next batch. Three weeks later, your profile has no active posts.
The fix: Set a recurring reminder to review and refill your content queue. Better yet, use a Google My Business scheduling tool to visually spot gaps before they happen. Aim to always have at least 2–3 weeks of posts scheduled ahead.
2. Using Generic or Non-Local Content
“Check out our latest products!” tells Google and your customers nothing useful. GBP posts that lack local relevance miss the entire point of local SEO.
The fix: Include location-specific details – your neighborhood name, nearby landmarks, and local events you’re participating in. “Stop by our Williamsburg location this Saturday for free coffee samples” is infinitely more compelling than a generic product push.
3. Ignoring Post Insights and Analytics
If you never look at your post-performance data, you’re essentially posting blindly. You won’t know what’s resonating, what’s falling flat, or whether your posting frequency is actually impacting your local rankings.
The fix: Dedicate 15 minutes each month to review your GBP Insights. Track trends over time, not just individual post metrics. Look for patterns in what drives calls, website clicks, and direction requests.
4. Not Optimizing Images for Mobile
The majority of local searches happen on mobile devices. If your images are blurry, poorly cropped, or don’t render well on smaller screens, you’re losing potential customers before they even read your post.
The fix: Always preview how your posts look on mobile. Use high-resolution images (1200 × 900 px minimum), avoid small text in images, and make sure the key visual element isn’t cut off by mobile cropping.
Keep Your Google Business Profile Working While You Don’t
Your Google Business Profile is one of the hardest-working assets in your local marketing toolkit – but only if you keep it active. Scheduling posts remove the biggest barrier to consistency: time.
For single-location businesses, Google’s native scheduler gets the job done. But the moment you’re managing multiple locations, working with a team, or juggling GBP alongside other social channels, a dedicated tool like SocialPilot helps you automate Google Business Profile posts, making the entire process a lot faster, smarter, and scalable.
The bottom line? Don’t let your GBP go quiet.
Try the free plan of SocialPilot today to schedule your posts, stay visible, and drive traffic from local searches.