
Creating a website mockup allows you to avoid diving headlong into creating your site! A well-designed site helps users understand the product/service, company and brand image through a variety of metrics. These include visuals, text and interactions.
This means that each element of your site must work towards a defined goal. But how to achieve this harmonious synthesis of elements? Through a holistic web design process that considers both form and functionality. This process has a name: create a website mockup.
Correctly established, it helps your web designers to create an efficient, professional interface linked to your objectives. So, how do you create a website mockup? Here are the 14 steps to follow! You can also ask your service provider to include the model in the quote for your website.
1. Create a mood board for your website mockup
A mood board is a collection of all the different design elements you want to add to your website: color palettegraphics, typography, video styles, etc. The mood board helps you design the website model by giving creative ideas.
As its name suggests, it helps you design a model that suits you personally and highlights your commitments.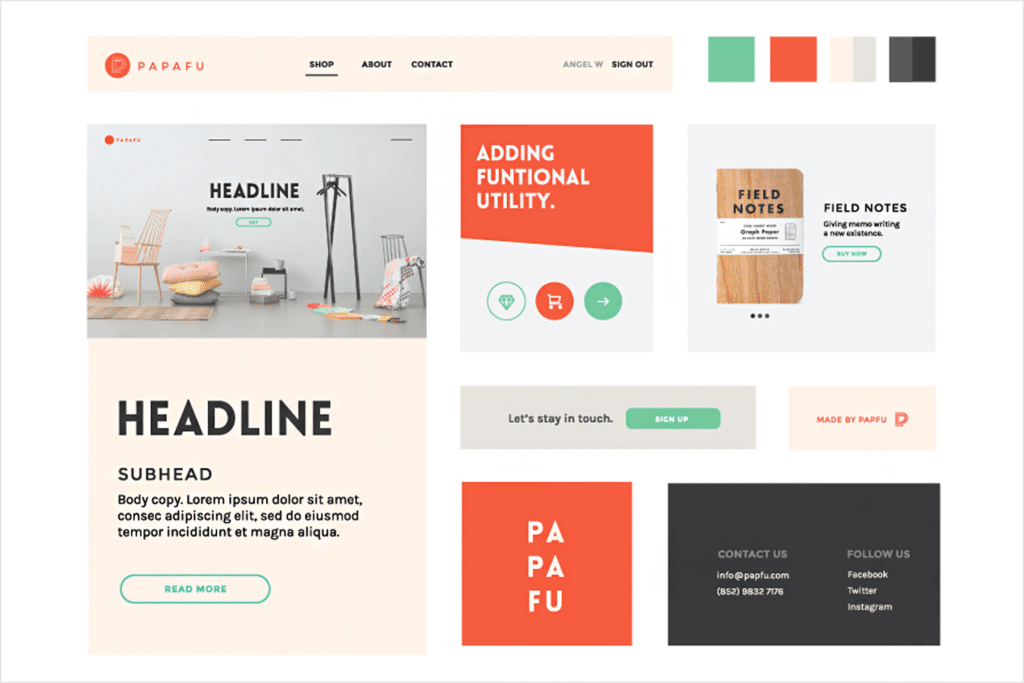
2. Define the layout and structure of the website mockup
Start by determining the hierarchy of your content using blocks and grids. Don't focus on the content itself, but on how it will be presented so that it grabs visitors' attention.
In terms of layout, the mobile-first approach will help you prioritize the most important elements to include in your mockup.
For the structure, it is a question of determining how the different pages of the site will be arranged: home page, contact page, optimized product sheetetc.
3. Determine the hierarchy of information
Next, think about the order of information you want to present to your visitors, from top to bottom, left to right. Designate the location of links, buttons and icons, as well as user flows.
Make sure your mockup is intentionally spare, but has enough visual hierarchy to elicit constructive feedback.
4. Map user flow
User flow refers to the path or journey a user takes during a browsing session on your website. This journey includes the entry point to the site, all interaction points (such as pages visited and buttons clicked through to the final transaction), and the exit point.
Your model must identify these different points and list them. Which will help you for the next step…
5. Place navigation and call-to-action buttons
Pay special attention to the design of your navigation elements and your calls to action. They must be clear, easy to understand and in bold letters.
Visual hierarchy, such as placing labels next to relevant fields and grouping related topics, can improve the readability of your mockup.
Be sure to think about different button concepts, their size, shade, and how they will be used.
6. Create a sitemap
A sitemap lists all the pages on your website and shows how visitors will get to each page from the home page. There are two main types of sitemaps:
Visual sitemap
Here it is a graphical representation of all your web pages in a hierarchical order. The visual sitemap allows you to design how users will navigate to each page and helps you strategize for each one.
XML Sitemap
An XML sitemap is a textual representation of all your web pages and their relationships. Its goal is to help search engines understand the structure of your site, crawl it and index all your pages. Its importance is crucial for your SEO.
7. Design a wireframe
Once your sitemap is complete, you will have an idea of how many pages to create for your website and how users will navigate to each one. The next step is to zoom in on each page and start drawing all the features. This is called “wireframing”.
A wireframe is the most basic representation of the entire website. These are simple diagrams that describe the relative positions of all elements on each web page (images, text, videos, etc.).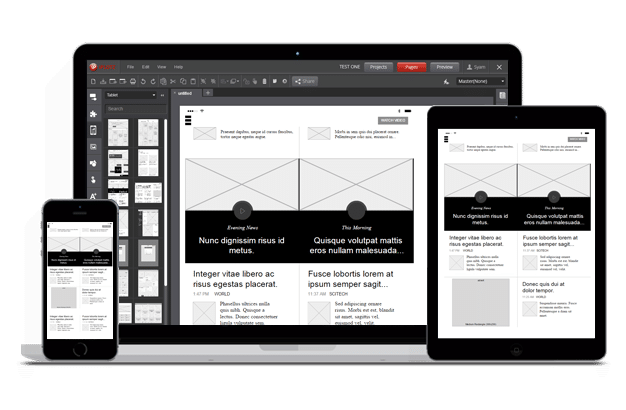
These elements are usually black and white to avoid distraction. They allow you to focus on finalizing the website architecture, before moving on to more detailed design work.
Start with a sketch on paper before using one of our tools to easily create a wireframe.
8. Decide on the colors of the site mockup
There color plays an important role on your website. It impacts visitors’ decision-making.
Start with the primary color, the one that will be the majority on your site. It should reflect your company image and brand voice.
Next, move on to the secondary color. Please note, this is not a variation of your primary color, but a shade that will provide contrast to the important elements of your pages.
Generally, secondary colors are found on:
- Action buttons
- Text selection
- Progress bars
- Orders
- The links
- The titles
- And any element that accompanies visitors' navigation!
Find matching color ideas on our free tool PaletteDeCouleur.net
9. Choose the typography
In addition to being an integral part of your graphic charter, and therefore of your brand image, typography:
- Directs user attention
- Improves general understanding of information
- Determines the hierarchy of elements and text in your website layout
However, too many fonts can cause conflicts and result in a jarring experience. As a general rule, you should have no more than two or three fonts in your design.
Simply alternating the size and format (bold, italic) of your font helps create contrast and hierarchy.
10. Integrate content into the website mockup
Content is central to website design. Whether it is a company presentation video, animations showing how a product/service works or a customer testimonialeach element must communicate a message or tell a story.
Place the available content in the mockup to visualize its integration and verify that it harmonizes with the overall design. If this is not the case, you will probably need to review the content, modify the organization of the page or add an additional section.
11. Determine the position and style of visuals
When it comes topicturesquality is essential. Remember that your model must reflect your final product as closely as possible, especially if you have to present it to your client or superior before validation. They need to have a faithful overview of the site that will be designed.
Make sure images are consistent, unique, and well-organized so they don't interfere with navigation or conversion elements.
Also read: How to create software? 7 steps to follow
12. Incorporate white space
White space, also called “negative space”, promotes understanding of the model (and the interface). It can help you attract and guide the user's attention or establish relationships between elements.
Once you've created the website mockup, take a step back and look at your design. Is there an appropriate amount of white space between elements?
Use white space consistently to bring simplicity to your design, like in this example: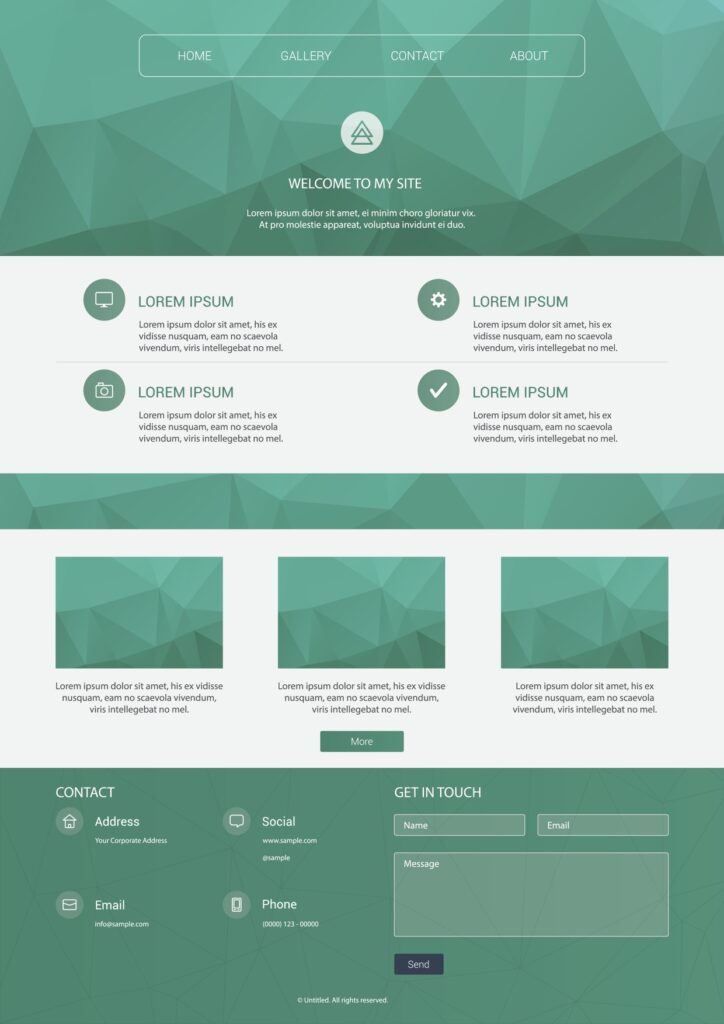
13. Move to a prototype
A wireframe represents the static aesthetic of each web element, but not their functions. To create a working model that you can navigate, you need a prototype.
Prototypes allow you to focus on designing your website workflow to ensure a user-friendly experience.
14. Add interaction
Once the graphic design of your website mockup is ready, it's time to add interactions. A mockup must be clickable, otherwise it will be much less effective for communicating ideas to stakeholders, for user testing and collaboration with developers.
When adding interactions to your website mockup, focus on basic product navigation, not advanced features. The objective is to test the navigation, to check the fluidity of the user journey and possibly detect blocking points.
Create your website mockup now
Creating a website mockup is essential to successfully complete your project and communicate clearly with clients (or superiors), as well as your team. In addition to bringing your ideas to life, this good practice allows you to reduce costs and obtain a website that 100% meets your expectations.
To reduce the price of your showcase site or e-commerce, to speed up the creation process and to master your project from A to Z, go through the model stage.
So, to create a successful website model, all you have to do is follow the 14 steps described in this article… or call on a web designer on Codeur.com !