If you have seen “MCP” mentioned frequently on LinkedIn or in AI newsletters and are unsure how it affects your workflow, you are not alone.
Here is a brief explanation.
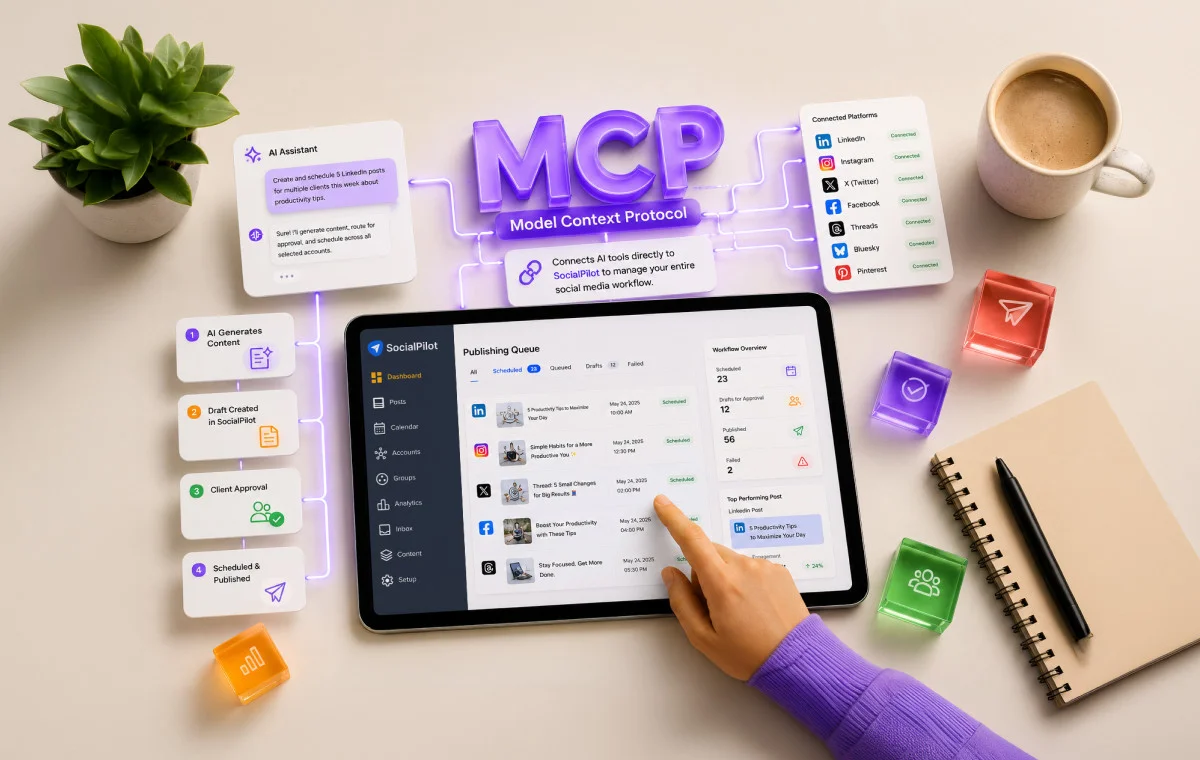
AI tools such as Claude and ChatGPT can now connect directly to your social media scheduling platforms and manage them. This eliminates the need for copy-pasting, switching tabs, or manually publishing posts across 40 multiple client accounts.
This capability is enabled by an MCP connector.
This article covers what MCP is, what it does specifically for social media scheduling through SocialPilot. We will also discuss who can benefit from it and how you can set it up step by step.
What Is MCP, and Why Are Agencies Talking About It?
MCP stands for Model Context Protocol. It is an open standard introduced by Anthropic in November 2024. Since then, OpenAI and Google DeepMind have both adopted it too.
While it may sound technical, the following analogy clarifies it.
Think of MCP like a USB-C cable. Before USB-C, every device needed its own cable. Your phone had one port, your laptop had another, and your camera had something completely different. Every new device meant sourcing yet another cable.
USB-C introduced a single standard cable compatible with all devices.
MCP represents a similar standardization for AI tools.
Before MCP, each AI tool required a custom integration for every application, often taking months of development. As a result, most tools remained disconnected.
With MCP, a single standard enables all compatible AI tools and platforms to connect. Tools such as Claude, ChatGPT, Windsurf, Cursor, Canva and Zapier can now integrate with SocialPilot using the same protocol, without custom engineering.
In practice, this means the following:
AI tools such as Claude or ChatGPT can now connect to your social media management platform, such as SocialPilot, and operate it directly. This allows you to manage your entire workflow within the AI tool (like Claude or ChatGPT), from content creation to scheduling and publishing, without switching platforms.
The infographic below compares an agency’s workflow with and without an MCP connector.

When you use SocialPilot’s MCP connector, your entire workflow is managed through a single conversation. You can instruct your AI tool on the required posts for the week, and it will connect to SocialPilot, access your accounts, client groups, and draft settings, and automatically create, route, schedule, and flag content for approval without requiring you to access the dashboard.
Once the MCP connector is configured, your AI gains direct access to your SocialPilot account, enabling not only post creation but also supporting your agency’s full operational workflow.
Here is a breakdown of what that looks like in practice.
Access to the full account roster and client group visibility
Before taking any action, your AI is aware of your complete SocialPilot setup, including all connected accounts, client groups, and platforms. This ensures the AI works with your precise account structure from the outset.
Post creation and scheduling across all platforms
SocialPilot’s MCP supports Facebook, X/Twitter, LinkedIn, Instagram, Pinterest, Threads, and Bluesky. You can instruct your AI to schedule a post across all LinkedIn accounts at a specified time, and it will manage every account in that group simultaneously, eliminating repetitive steps.
Draft management for approval workflows
When content requires client or team approval before publishing, your AI saves it as a draft in SocialPilot and flags it for review. The draft is then assigned to the appropriate client, allowing for review before scheduling.
Delivery monitoring without leaving the chat
Your AI can inform you of published, queued, failed, and skipped posts directly within the conversation. There is no need to access a separate dashboard to review weekly output.
Analytics are pulled directly into the conversation.
Performance data is available without switching to the analytics view. You can request your AI to report on a specific client’s post-performance, and it will provide the data within the conversation, eliminating the need to toggle between tools or export reports.
Below is an MCP Prompt cheat sheet to manage different workflows in the AI tools.

All workflows can be managed without opening SocialPilot. The conversation serves as the interface.
Before Moving Further: Here’s What MCP is Not!
It is important to clarify the following points, as they are common sources of confusion:
- MCP is not Zapier. Zapier triggers automated actions when specific events occur. MCP gives your AI direct, ongoing access to a tool so it can reason about what needs to be done and act within a live conversation. They are different tools for different jobs.
- MCP is not a browser extension. Nothing is being clicked or scraped on your behalf in the background.
- MCP is not a one-off native integration between two specific products. It is a universal standard, and any compatible AI tool can use it.
Simply put, an MCP is what turns an AI assistant into an AI operator.
Who Actually Needs This?
MCP may not be necessary for every social media agency at this stage.
MCP is particularly useful if:
You manage multiple client accounts.
When managing more than a few clients, manual copy-paste workflows become time-consuming. MCP eliminates this inefficiency at its source.
If your agency already relies on Claude or ChatGPT as a primary workspace, MCP expands the capabilities of these tools. You are enhancing your existing workflow rather than adopting a new one.
You run content approval workflows.
If clients or team members must review content before publishing, MCP’s draft management streamlines the approval process by removing manual steps.
If you are building or interested in agentic workflows, and your goal is to move content from research to publishing without manual intervention, MCP enables this complete process.
You may not need MCP yet if:
- You manage only one or two accounts with straightforward publishing needs. In this case, your scheduler’s native interface is likely more efficient than configuring a connector.
- You work primarily on mobile devices. Most MCP setups require a desktop AI client and are not optimized for mobile use.
- You do not yet use AI tools regularly in your workflow. It is best to establish consistent value from AI first, as the connector is most effective when AI is already integrated into your processes.
The straightforward take.
MCP becomes genuinely valuable when you are already spending significant time generating content in an AI tool and then manually handling the publishing side. If that describes your current workflow, this connector removes that step permanently.
This setup takes less than five minutes, though steps may vary depending on your AI tool and preferred authentication method.
There are two connection methods. Signing in directly is simpler for most users, while using an API key offers more control for custom workflows or development environments.
Method 1: Sign In with Your SocialPilot Account (Recommended)
This is the most straightforward setup. You connect by logging into SocialPilot through Claude, with no manual copying or configuration required.
1. Open Claude, click Customize in the left sidebar, and then select Connectors from the menu.

2. Click the + icon and choose Add Custom Connector.

3. Then give your connector a name, something like “SocialPilot” works fine. In the URL field, paste the following and click Add: https://mcp.socialpilot.co/mcp

4. Your new connector will appear in the list. Select it and click Connect.

5. A sign-in prompt will appear. Enter your SocialPilot email and password.
Once you complete the sign-in, your SocialPilot account is live inside Claude. Your AI now has access to your accounts, groups, drafts, schedule, and delivery status from within any conversation.
Method 2: Connect Using Your SocialPilot API Key (Advanced)
Use this method if you prefer API key authentication or are setting up a custom or developer workflow.
Step 1: Get your API key from SocialPilot
1. Log in to your SocialPilot account.
2. Click your profile icon in the top-right corner and then go to Security.

3. Scroll down to the API Key section and copy your key.

Step 2: Add the connection to Claude
1. Open Claude, click on Customize in the left sidebar, then select Connectors. (same steps as shown above)
2. Click + and select Add Custom Connector. Name your connector, and in the URL field, enter: https://mcp.socialpilot.co/YOUR_API_KEY/mcp, replacing YOUR_API_KEY with your actual key.

3. Click Add.
Select the connector from the list and click Connect.
The API key manages authentication instead of a login. This approach is especially useful for building automations or working across multiple environments.
If you use Claude Code to build workflows or automation pipelines, you can connect SocialPilot directly through your terminal. There are two authentication methods available.
Method 1: Sign In via Browser (Recommended for Claude Code)
This method opens a browser window for login and completes authentication without requiring your API key.
Before starting, ensure Claude Code is installed and running, and have your SocialPilot login credentials available.
Step 1: In your terminal, run the following command: claude mcp add socialpilot https://mcp.socialpilot.co/mcp –transport http –callback-port 3118
This command registers the SocialPilot MCP server with Claude Code and initiates the browser-based login process.

Step 2: A browser window will open automatically. Sign in with your SocialPilot email and password and complete the authorization.
Step 3: After signing in, restart Claude Code to ensure the connection loads correctly.

Step 4: Confirm the connection is active by running: claude mcp list
SocialPilot should appear in the list with a Connected status, as shown above.
Method 2: Connect Using Your API Key in Claude Code
This method bypasses browser login and authenticates directly using your API key. It is suitable for local development environments or when a faster setup is preferred.
Step 1: In your terminal, run the below command, replacing YOUR_API_KEY with your actual key:
claude mcp add socialpilot https://mcp.socialpilot.co/YOUR_API_KEY/mcp –transport http
Step 2: Restart Claude Code to apply the new connection.
Step 3: Once it restarts, run: /login. Then complete the login steps when prompted.
Step 4: When asked, approve the required permissions to finalize the connection.
Step 5: To verify that everything is working, run claude mcp list, and SocialPilot should be shown as connected (as shown above).
Prefer to follow along visually? Watch the full setup walkthrough here:
ChatGPT supports MCP connectors for users on Pro, Business, Enterprise, and Education plans.
Step 1: Go to Settings inside ChatGPT.

Step 2: Navigate to Apps, then Advanced Settings.

Step 3: Turn on Developer Mode and then select “Create App”.

Step 4: Enter the MCP server URL: https://mcp.socialpilot.co/mcp and complete the authentication steps when prompted.

Once connected, ChatGPT can access your SocialPilot account and manage scheduling, draft management, and delivery monitoring directly from the chat.
Note: The above setup is required only once. All subsequent actions through the connector will follow the permissions of your existing SocialPilot account.
Most social media MCP servers support only basic post creation and publishing, with limited additional functionality.
SocialPilot’s MCP server is a first-party implementation, developed directly by SocialPilot rather than through third-party plugins or community solutions. This distinction provides deeper and more reliable access to the product, including accounts, client groups, draft states, delivery data, and analytics, not just publishing.
This comprehensive access makes it especially valuable for agencies managing multiple clients. The connector is compatible with Claude, ChatGPT, Cursor, and any MCP-enabled AI client.
If your agency already uses AI tools daily for content creation but manages publishing manually, this solution can significantly improve your workflow.
Connect SocialPilot’s MCP to Claude or ChatGPT to experience a fully automated workflow managed by AI.